| < 9: Forms and Formfill Blocks | Documentation index | 10: Compute blocks and Formula rules > |
9b: Working with PDF forms
A PDF form is a file that typically contains spaces in fixed positions into which information must be entered. This ensures that data can be identified by its position on official forms, but it's not as flexible when the test has to flow, such as in a letter.
The process to create a Form that a chatbot can populate with entered data is:
Step 1: Creating a Form
If you are using a PDF form you must upload it first, so that you can then identify where the fields should be placed on the form using nocodebots.ai.
Follow these steps to create a new Form:
- Click "Forms" on the sidebar menu, then "New"
- Enter a Description for the Form
- Click "Save" - this is important: you can't upload a form until you do this.
- Click the "Upload" button that appears in the top menu
- Click "Choose files" and select the PDF file that contains the form.
- Click "Start upload"
This will upload the file and then exit to the list of Forms, where you can see the one you've just created.
Step 2: Mark up the fields
To edit any aspect of a PDF Form (description or Fields), click on the name in the list of Forms. This will display the attached form, which can then be marked up.
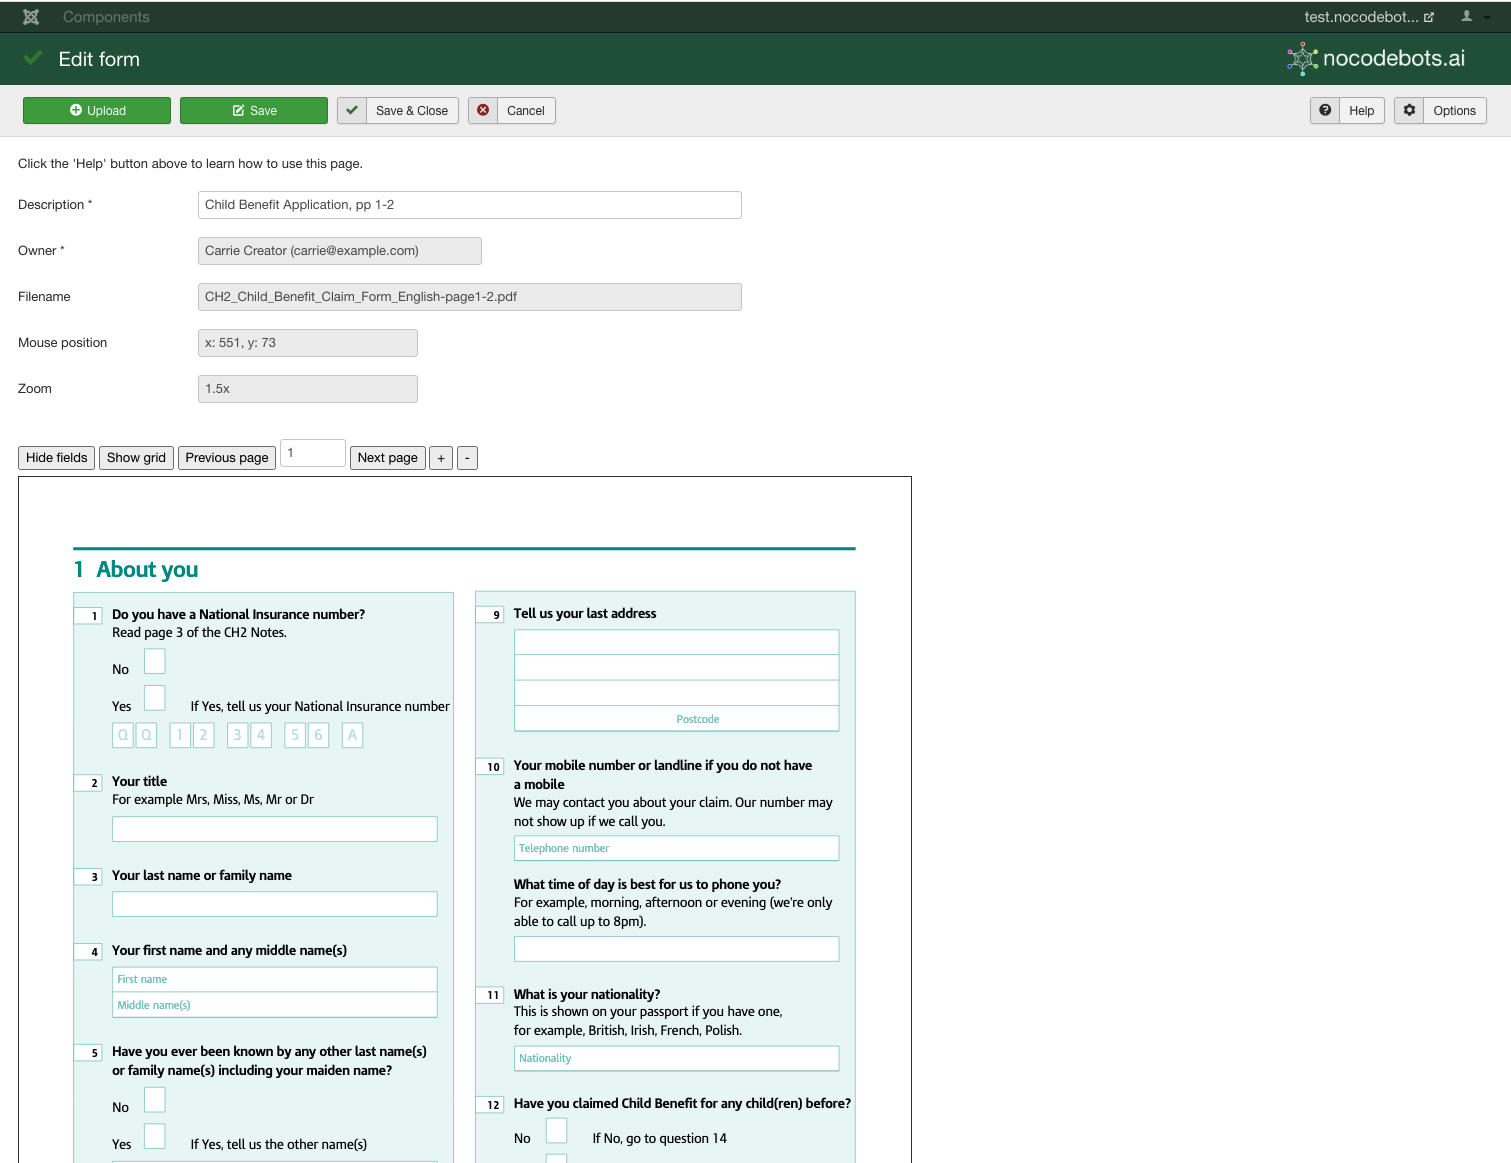
The buttons above the form have these functions:
- Hide/Show fields: toggle between hiding and displaying the marked-up fields
- Show/Hide grid: toggle between showing and hiding a grid on the form - this is useful if you want to align fields with titles on a form with a blank background, such as a template letter.
- Previous page/enter page number/Next page: navigate multi-page forms
- +/-: zoom in and out
Marking a new Field
Marking a Field is very simple once you get the hang of it - follow these steps to become an expert!
- You need to click on the diagonally opposite corners of the rectangle that outlines the field: in other words click the top-left corner then the bottom-right one (or "bottom-left/top-right" or "top-right/bottom-left" or "bottom-right/top-left").
- After the first click a dashed blue rectangle will follow your mouse to show the position of the new field until you either click on the opposite corner to define the marked-up area or hit the "Escape" key to cancel adding the new field.
- Once you have clicked the second point you'll be asked to complete the following parameters for the Field:
| Parameter | Options | Description |
| Shortcode | The default is FIELD_x_y where x and y are the coordinates of the top-left corner of the field. | You should change this to match the shortcode of the block in the flow that will be used to populate this field on the form. |
| Input selection |
Merge the full answer (default) |
This will write the whole answer onto the field in the form. |
|
Merge part of the answer |
This will allow you to extract part of the answer, e.g. to split a date. Valid formats for the "part" field are: 1. single digit: extract that character from the answer (starting from 1) Examples, using answer="24/10/2023":
2. range: extract from the first character to the second (starting from 1) Examples, using answer="24/10/2023":
|
|
| Text colour | Black (default) | Select the font colour to use when writing this field on the form |
| Text font | Helvetica (sans serif, default) Times (serif) Courier (fixed-width) Symbol ZapfDingbats |
Select the font to use when writing this field on the form
|
| Text size | 12 (default) | Enter the size of the text to write on the form |
| Text style | Normal (default) Bold Italic Bold+Italic |
Select the font style to use when writing this field on the form |
| Background colour | White (default) | Select the background colour to use when writing this field onto the form |
Change the values as required and then click the "Save this field" button at the bottom of the popup.
If you decide not to keep the field, click the "Close" button instead.

Editing a Field
To edit a Field just click on it, then update and save the values in the same way as adding a new field.
Deleting a Field
To delete a Field, click on it, then click the "Delete this field" button on the popup and confirm that you want to delete it when prompted.
 You can continue to work on the Fields you want to define but remember that the changes you make are only saved to the nocodebots.ai server when you click the "Save" or "Save & Close" buttons at the top of the screen. If you want to discard all of the changes you made since the previous save, just click the "Cancel" button instead.
The marked-up form will look something like the one below.

PDF forms with embedded fields
Many PDF forms are simple image documents that are intended to be printed out and filled in by hand. However some PDF forms contain embedded fields for the user to type into, for example using a PDF plugin in a browser. This is often the case if a form is downloaded from a government website for example. You can tell whether the form contains embedded fields by displaying the form in a browser and testing whether you can enter text into the fields on it.
Embedded fields are removed when the form is completed by a FormFiller block, because otherwise the text that is inserted is hidden by the embedded field, which sits 'on top'' of the file background. In order to ensure that the forms generated by a FormFiller block are as visually similar as possible to the original, you should use the embedded fields as a guide when marking out the fields to be filled, and you should select the same colour as the Background Colour when editing the Field Parameters.
| < 9: Forms and Formfill Blocks | Documentation index | 10: Compute blocks and Formula rules > |